Advanced Tutorial - Using the David Griffiths Lake Applet with 'horizon' effect
This tutorial assumes that you have already downloaded the latest version of David Griffiths Java Lake applet - you will need the file 'lake.class'. If you need this get it from here.
Laking that 'impossible' scene - The David Griffiths applet with horizon parameter
There are some pictures which have until recently been just impossible to apply an accurate lake applet to. Now, with the introduction of David Griffiths' latest version of the lake applet which has a 'horizon' parameter a realistic result can be achieved.
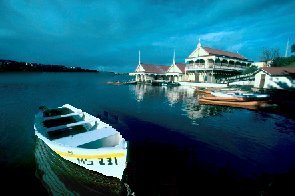
Let's take a look at one of these 'impossible' pictures and see what happens without the horizon parameter.
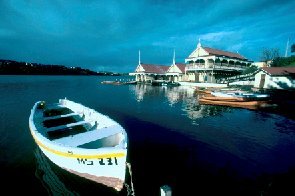 |
Original image Doesn't look too difficult at first glance does it? Well click here to see how I first saw it 'laked' on the web - |
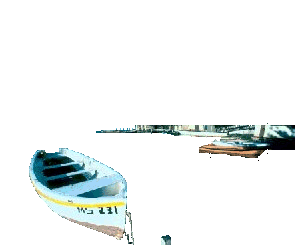
Let's try again this time following a few common sense rules such as beginning the reflection at the far limit of the water in the source image and using an overlay. -
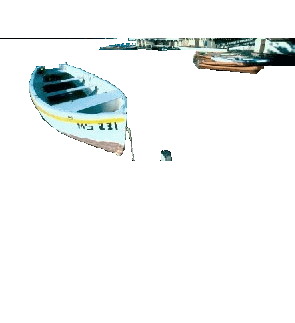
| The source file used is 75 pixels high (both images shown half size here) | The overlay is all the none water part of the original image below 75 pixels - the red area is set to be transparent | ||
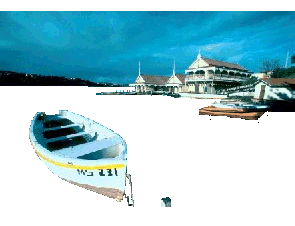
See what the result is here |
|
If we wish to retain the original image size then further modifications must be done.
To get a reflection under the tender we need to alter the source image. This is done by selecting the lower half of the original image, inverting it and deleting the tender and post. Since the reflection is very faint it has been intensified. This takes a little time but you need not be too accurate since the result will be distorted by the ripples. We'll also need to lower the point at which the reflection starts to half the original image height - 98 pixels. This means there will be an area of water in the distance 23 pixels high which won't be animated - can't be helped with this method. Here are the images to be used:
|
|
See what the result is here
David Griffiths, the author of the Lake applet has added a new 'horizon' parameter which makes it possible to overcome all the problems in laking difficult subjects. When the horizon parameter is used, instead of a reflection being created, the applet progressively distorts all the image below the level set by the horizon parameter. The effect is similar but superior in that it does not produce such a 'glassy' look. It's ideal for an image where a large body of water is in the original image.
The 'horizon' is set to the height of the farthest away water in the original image. An overlay is created containing all the non water bits below the 'horizon' level. Getting the overlay right can be a bit tricky. Here's the procedure we use:
- We set the background color to a color not used in the original - usually we use pure red, green or blue.
- we add about 200 pixels at the top of the original image (increase the canvas height).
- We then delete all the water area and select all that remains in our image editor.
- We move the selected area almost to the top of the image - within about 10 pixels.
- We save the image as a gif file with the transparency set to the background color
- Try out the applet If the overlay is too low move it higher in the overlay image, add more blank space at the bottom of the image by increasing the canvas size if necessary. If the overlay is too high move the non transparent part lower in the overlay image.
| Source image | Overlay image | |
 |
|
|
<applet code="lake.class" id="lake" width="295" height="196"> |
There,
simple wasn't it? Have fun, but if you run into problems,
feel free to email
us for help :)
For a VERY small fee, we'll even do
it for you!