 A Guide to Using
PowerPoint
A Guide to Using
PowerPoint
Part 1
Starting PowerPoint
Choose Start > Programs > Microsoft Office > Microsoft PowerPoint
You will see the PowerPoint Splash logo (above) and will then be presented with this screen:
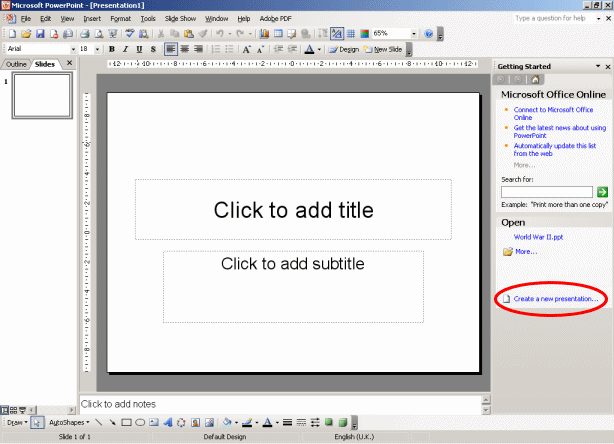
If you are returning to edit a presentation you have already started you should see it's name in the 'Open' section. if this is the case double click it to load it and continue editing otherwise in the 'Getting Started' section at the right choose 'Create a new presentation'
Choosing a Design Template
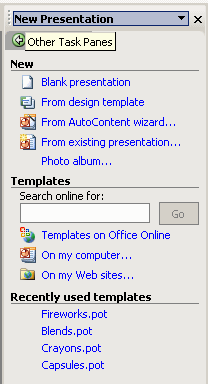 The menu at the right will now change to offer a choice
of new presentations. You can choose 'Blank
presentation' to start from scratch or choose an easier
option - 'From design template'
The menu at the right will now change to offer a choice
of new presentations. You can choose 'Blank
presentation' to start from scratch or choose an easier
option - 'From design template'
If you choose to start from a blank presentation you will have complete control over everything in the presentation but it will take a lot of work to get it looking right.
If you choose to use a design template then much of the work will be done for you. There is nothing wrong with this, especially since it is still possible to adjust the pages later. You may however not find exactly the correct layout which you require.
You can also choose to search the Web for templates which might be suitable. Remember here that if you don't find what you are looking for you may get better results by changing the keywords you search for.
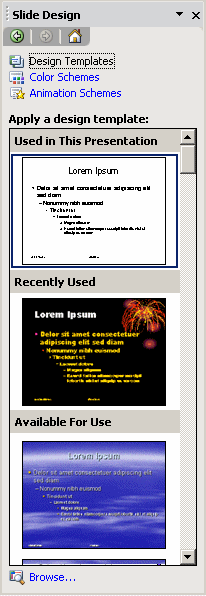
Choose 'From design template' and the right hand section will change again to show different templates. Yours may not be the same as shown here. You will have to use the scroll bar at the side to see them all. Each one is shown in a small preview window so you can get an idea of what it will look like without having to completely load it. Clicking on a template will load it into the main window.
The first slide of a template is often slightly different to the rest of the slides since your presentation will usually begin with a page showing a title and the author's name (you).
Templates usually set the background images and foreground colours so you should not find silly combinations such as yellow writing on a white page or black writing on a black background!
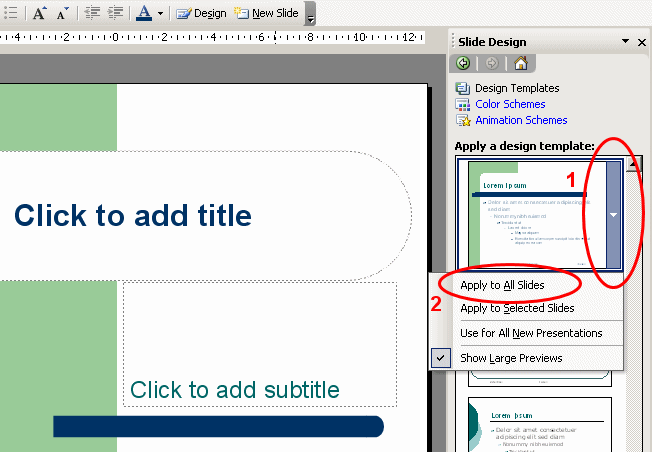
If you like the template chosen you now need to apply it to all slides. It's possible to choose a different template for each slide but this is not a good idea since it makes the presentation look unprofessional and confusing. To apply the template to all slides click on the dropdown which appears at the right of the template and select 'Apply to All Slides' as below.
Adding and formatting text
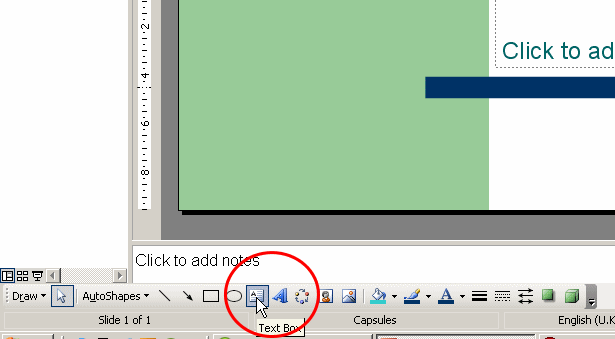
You can type in text as normal. Usually you will find a text box on the slide telling you where to add text. If, however there is no text box you will need to add one by using the text box tool. You will usually find this in the drawing toolbar at the bottom of the screen or you can choose Insert > Text Box.
Normally, if you are using a template, the text will
be a suitable style, size and colour. It will also resize if you add
too much text so that it fits in the space available.
![]() Never add too much text to a slide. Stick to a limit of 50
words maximum!
Never add too much text to a slide. Stick to a limit of 50
words maximum!
Of course you can change any feature of the text - font, size, colour, face (bold or italic). Use the format toolbar or choose Format > Font.
Adding an image from clip art
To add a clip art image at any location use Insert > Image > From Clip art. In the past clip art was installed with Office but with the latest version of Office the clip art is now stored on the web. A search window will open at the right in which you can type a keyword or keywords of what you are looking for. Whatever you find - make sure it is appropriate to your presentation and not just 'cute'. For example - in a presentation about the Solar System is a picture of three dancing aliens really appropriate?
Add a picture
To add a picture at any location use Insert > Image
> From File . A window will open in which you may browse
for the image file you want. If you wish - click first on a picture
frame in a template window. 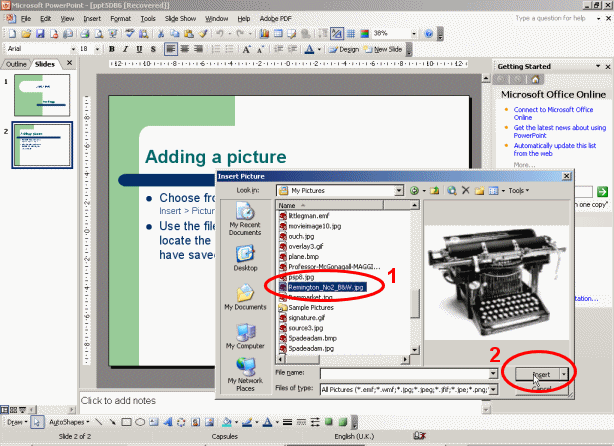
Select the image you
want and click 'Insert'.
If the picture appears at the wrong place just drag it to where you want it. If you match up the corners of a picture with the corner of a picture frame in a template window then the picture will snap to the correct size.
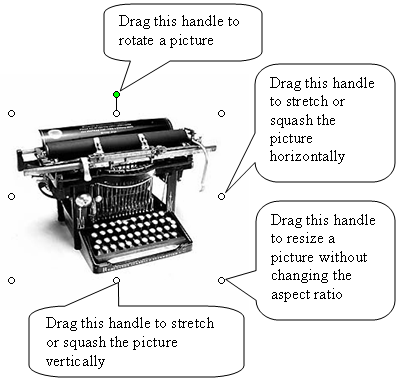
You can resize a picture by dragging the 'drag handles' at the edge of a picture but remember - if you drag anything but the corner then the picture will be distorted - it will no longer be the correct aspect ratio
Adding sound
To add a sound to a slide which plays on the slide opening
choose
Insert > Movies and Sounds > Sound from
File...
You can then browse for the sound file you want
and insert it as you inserted a picture. Once selected you will be
offered a choice of - 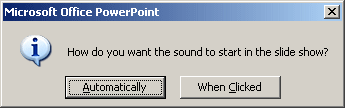
Choosing
Automatically will play the sound when the slide loads.
A sound icon![]() will automatically be inserted on your slide. This icon can be
repositioned and if you wish made invisible by right clicking on it
and selecting 'Edit sound object'. In the window which appears you
can then tick 'Hide sound icon during slide show'. The sound icon
will still be visible while you are editing the slide but won't show
during the presentation.
will automatically be inserted on your slide. This icon can be
repositioned and if you wish made invisible by right clicking on it
and selecting 'Edit sound object'. In the window which appears you
can then tick 'Hide sound icon during slide show'. The sound icon
will still be visible while you are editing the slide but won't show
during the presentation.
Add a background image 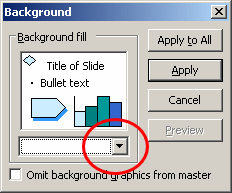
It's possible to change the background image of slides as follows:
- Right click in a blank area of the slide
- Choose Background
- In the background window which opens click the triangle at the bottom right of the 'Background Fill' area
- From the menu which appears choose 'Fill Effects...'
- In the window which appears choose the 'Picture' tab at the top
- Click on the 'Select Picture...' button.
- Select the picture you want as the background image in the filer window which opens.
- Click Insert then OK
- Select 'Apply to all' to add the background to all slides or 'Apply' to add the background to the slide you are using only.
Remember:
- It is possible to change the background image of a template.
- Different backgrounds on different slides make the presentation look unprofessional.
- You need to be able to read the text against the background.
- A strong background image will take the audiences attention away from the message you are trying to give them.
Saving your work
Saving your work is vital before you go too far. It is easy to lose all of it if you haven't saved it. To prevent this you should save your work as soon as you start it and then at least every 10 minutes.
- Choose File > Save
- The first time you save a file a Save As... window will open. You should navigate to a suitable area (Try GNVQICT > Unit 7 Multimedia) and give the file a sensible filename which tells you what it is about. Try using the presentation's title as a filename.
- In future you can save the file by clicking on the Save icon
 or using
File > Save. You won't see the Save As...
window again unless you choose File > Save As...
or using
File > Save. You won't see the Save As...
window again unless you choose File > Save As...
| Remember | If you want to save an earlier version you must change the
filename using File > Save As... to avoid saving over the first version |
It is possible to save PowerPoint files as more than one
filetype. If you wish you can save web pages, pictures, older
versions of powerpoint files and as pps files where the presentation
will start as soon as it is loaded rather than in the editor. To
choose any of these different file types choose File >
Save As... and set the
Save as Type...
area to the file type you want.
Insert a new slide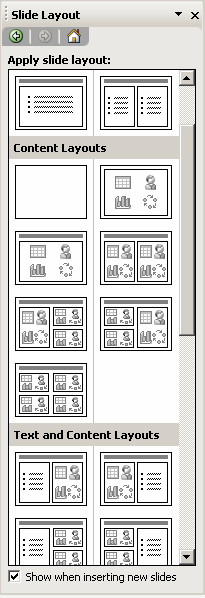
When you need a new slide use Insert > New Slide...
The slide layout window will open at the right of the screen.
From the layout choose the style you want by clicking on it. The slide will load in the main window. If you decide it is not the layout you need just click on another layout in the layout window.
Changing the position of a slide in a presentation
You can change the position of a slide in a presentation by selecting the slide icon in the left hand column of the PowerPoint window. You can use the icon in either 'Outline' or 'Slides' view. Drag the icon up or down the column. As you do so you will see a black line appear showing it's new position. When you release the mouse button the slide will be at it's new location in the presentation and will be renumbered accordingly.
Excluding a slide from a presentation
Sometimes you may not want a slide to appear in a presentation unless a link is clicked on in another slide. An example would be an index page. To exclude a slide:
- Move the slide to the end of the slideshow
- Choose Slide Show > Set Up Show...
- In the window which opens select Show Slides - From and make sure the numbers do not include the slide you want to exclude
"All things are difficult before they are easy."- Thomas Fuller