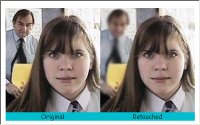
Most professional pictures printed in magazines are retouched in some
way. An image may be softened, blurred, smudged, adjusted for hue; saturation;
brightness or contrast or even sharpened. Eye colour can be corrected.
Scratches and blemishes can be removed and it is even posible to create
the impression of movement in a still image by adding 'motion blur'.
In this tutorial you will learn how to use the clone tool, how to select
an area and blur it and finally use the soften brush.
Of course you can go further - you could straighten the collar and tie
and remove the slightly greasy look of the girl's hair at the top right.
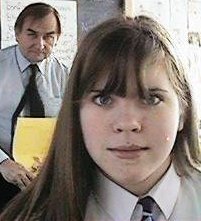
You will need an image to practice on. Let's use
this one.
It has:
a distracting background
a spot on the girl's cheek
grainyness around the girl's neck
harsh skin tones
Step by step we will correct this image by retouching it.
First you need to get familiar with using the clone tool:
Learning how to use the clone tool
Watch this movie produced by the manufacturers of PSP which
teaches you how to use the clone tool:
Your first step will be to right click on the image and choose
copy. Next load PSP and paste the image into it by holding down
Ctrl while you tap the V key
Remember you can come back to this window and watch the movie
again. You can pause it at any stage using the pause button and then
return to the PSP window to try it out.
Using the clone tool to get rid of a spot!
Your first step will be to scroll up, right click on the image
and choose copy. Next paste the image into PSP by holding down
Ctrl while you tap the V key
Use the skills you learnt above to remove the spot. You may
find it helps to zoom in on the picture to 300% scale. You can
usually use the scroll wheel of your mouse to do this.
Take screenshots as you make changes and paste them into Word
- You can use them as a prompt when you do this again later.
Your next step will be to blur that annoying background which
detracts from the subject. First you will need to select the area to
blur.
Since the image has now more than one layer, click the
background layer on which you want to make a selection from the
Layer palette.
On the Tools toolbar, choose the Freehand Selection tool from the Selection tool flyout.
On the Tool Options palette, choose the Selection Type to
determine how Paint Shop Pro makes the selection:
To apply a Blur effect:
On the Layer palette, click the layer containing the area you
want to blur .
To limit the blur to a specific area, make a selection in the
image.
Choose Adjust > Blur, then choose an effect.
For the Blur and Blur More effects, the effect is applied to
the image or selection.
For the Average, Gaussian, and Motion effects, a dialog opens.
Choose from the options, then click OK . The effect is applied to
the image or selection.